Wednesday, March 23, 2011

Virtual Image Catalogs

Recently, I began cataloging a variety of images that inspire me. I've linked to some of my favorite blogging friends' beautiful images (that's you!), and also some great images I've been finding all over the internet.

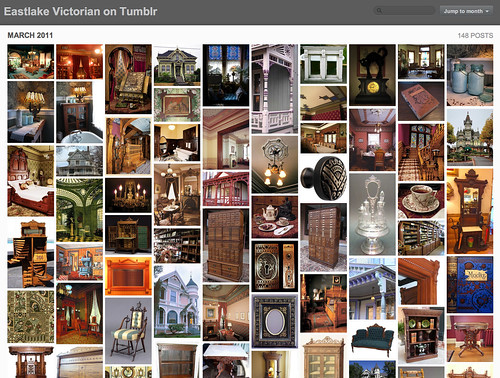
I began using the blogging format of Tumblr first. I found the site to be somewhat "buggy" and not as user-friendly as I would have liked. But I'll continue to post photos I find to my Tumblr blog anyway. I like their "archive" feature, in that all your photos cascade down the page and you can see them all at once! It's very cool. When you find a great image someone else has posted, you can "reblog" and the image will appear in your posting stream, along with the link back to the original source of the image.

Tumblr

Tumblr archive

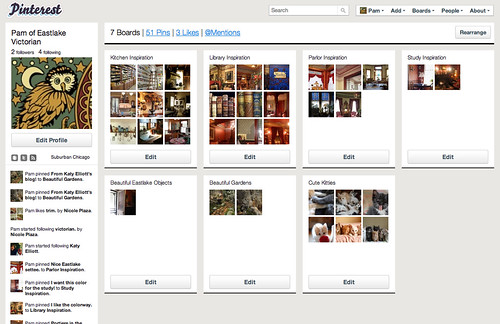
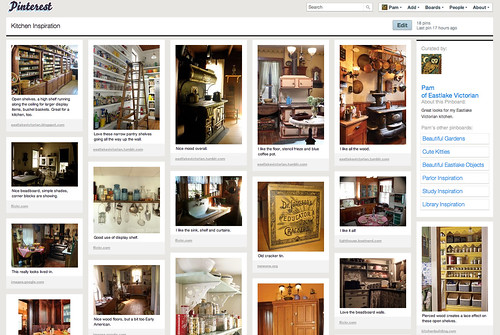
I also just got invited to join Pinterest, the virtual pinboard catalog service! I love the way Pinterest lets you create an unlimited amount of "pinboards" so that you can categorize the things you love. It also has a handy button you can place on your bookmark bar in your browser window. That way whenever you come across a great image you'd like to save, you can just "pin it" to your chosen Pinterest pinboard. What a great idea!

Pinterest 1

Pinterest 2

I found that Tumblr lets people post almost any image, including nudity and violence. So if that offends you, stay from it. Pinterest is trying to keep their site free from nudity and vulgar imagery, and encourages people to report offensive images. I like that feature, as I like to be a proper Victorian lady!

When you sign up for Pinterest, it asks to link to either your Facebook or Twitter accounts, which I thought was weird. I've been using both for years, but I didn't want to link to my personal accounts. So I created a new Twitter account just for my Eastlake Victorian persona and linked to that.

There are now Tumblr and Pinterest buttons I placed on my sidebar if you ever want to see what cool images I've been drooling over! If you want to create your own Tumblr or Pinterest accounts, feel free to link to mine, or grab any of my images you may like. Since I've been saving images for awhile now, I may have taken some of your personal images and forgot where I got them. If you see an image I'm using that belongs to you, let me know and I'll either give it a link back to your blog, or remove it entirely if you prefer me not to use it!

If you haven't tried Tumblr or Pinterest, it's something to consider, especially if you would love a way to catalog all the beautiful images you run across while surfing the net!

Labels:

Sunday, March 20, 2011

Kitchen Floor Restoration

Floor 9

My recent post showing our kitchen really got me thinking; I needed to start renovating this room! The flooring is so ugly. So two weeks ago, I began the task of ripping up the vinyl floorcovering and the underlayment. I started on an area 3' x 5'. I started pulling up the peel-and-stick vinyl tiles first. They came up easily, but left an extremely sticky film on the particleboard underlayment beneath. The particleboard was nailed to the floor below, so I then began breaking it off in pieces, getting as many nails out as I could, and countersinking the nails that broke during the process.

Floor 6

What I found below was a beautiful oak floor! Well, not exactly beautiful. In a couple tiny spots underneath the toe kick near the counter, I found beautiful varnished oak flooring.

Floor 8

The rest of the floor had a thick layer of old, whitened adhesive stuck all over it. I've read that in Victorian houses, hardwood flooring was used in the public rooms, not in kitchens and second story rooms. I am very fortunate to have original oak flooring in my kitchen! Why anyone would ever coat beautiful hardwood floors with adhesive and cover them with ugly linoleum or vinyl flooring is beyond my comprehension. I believe the adhesive on my floors was from a previous flooring installation, before the particleboard and peel-and-stick vinyl.

Floor 7

My next problem was how to remove this old adhesive. I scoured the internet, looking for ways other people have found to remove old flooring adhesive. I tried mineral spirits... nothing. Then I tried Goo Gone, which I love to use for removing sticky price tags... still nothing.

Floor 1

Then I came across a forum where an architect from Milwaukee had used a steamer to soften his flooring adhesive, then scraped it away. I went out and bought a wallpaper steamer and gave it a try. It really does work! It still requires a lot of elbow grease, and there's still a layer of stubborn adhesive scum on the floors. Also, kneeling for long periods of time is not working well for my old arthritic knees! So I've been trying to keep the work to 1 hour increments. When I first started the scraping process, my right thumb became numb and stayed that way for 2 days. But I've always been a proud do-it-yourselfer, so I'm sticking to my guns and getting this project done even if it kills me!

Floor 5

At this rate, it will take no less than 3 months to remove all the floorcovering and scrape the oak floors. I've only worked on it a few weeknights, and mostly only a few hours on the weekends, but I think I will love the end results.

Floor 4

I had thought of renting a floor sander, but I'd like to remove as much adhesive as I can by hand first, since I read adhesive gums up sanders like crazy. The friction melts it enough to clog the sanding pads. I may try a safe soy-based paint remover to see if that does any good on the remaining adhesive. I'd like to keep the integrity of the oak flooring as much as possible, as sanding always removes some wood, and the patina as well.

Floor 3

There's no turning back now. The floor project will move at a snail's pace, but I will get it done! And I am so thrilled that I found the original oak flooring underneath. I'll keep you posted on my progress!

Floor 2

Labels: ,

Monday, March 14, 2011

St. Patrick Celebrations

Irish Dancers

Being a wee bit Irish, I always celebrate St. Patrick's Day! This year, our local businesses organized a St. Patrick's Day parade and festival that was held on Saturday. It was a cold and windy day, but everyone seemed to have a good time.

Parade Car

Parade Marchers

Starbuck's

Parade Float

My favorite part of St. Patrick's celebrations are the music and the dancing. We saw a young Irish step dance group perform at the fest. They had to wear their Irish sweaters to stay warm. The littlest girls were so cute! I took a short video to share:


Terry and I couldn't resist these green cupcakes!

Irish Cupcakes!

I made a batch of Irish stew and baked some Irish soda breads. We have plenty of leftovers to celebrate again on Thursday! I thought I'd share my recipes with you all.

Everybody can be a little Irish on St. Patrick's Day. Have fun!


♣ ♣ ♣ ♣ ♣ ♣ ♣ ♣ ♣ ♣ ♣ ♣ ♣ ♣ ♣ ♣ ♣ ♣ ♣ ♣ ♣ ♣ ♣

Irish Stew

Serves 4

1 tbl. olive oil
1 small yellow onion, chopped
1 stalk celery, chopped
5-7 small waxy white potatoes, quartered
1 lb. baby carrots
2 cloves garlic, minced
3 cups low sodium veggie broth
1/4 cup dry red wine
2 bay leaves
1/4 cup low sodium soy sauce
1-1/2 cups roughly chopped cabbage
1 tsp. dried thyme
salt and pepper to taste
1 can chickpeas or cannellini beans

Heat oil in a large pot over medium heat. Add the onion and celery, cover, and cook until softened, about 5 minutes. Add the potatoes, carrots, garlic, broth, wine and bay leaves. Bring to boil, reduce heat, cover and simmer on low for 15 minutes.

Add the soy sauce, cabbage, thyme, salt and pepper, cover and cook for 15 more minutes.

Add the beans and gently simmer 10 more minutes.


♣ ♣ ♣ ♣ ♣ ♣ ♣ ♣ ♣ ♣ ♣ ♣ ♣ ♣ ♣ ♣ ♣ ♣ ♣ ♣ ♣ ♣ ♣

Irish Soda Bread

Makes 2 loaves

5 cups white flour
1 tsp. baking soda
2 tsp. baking powder
1 to 3 cups of fresh raisins
3/4 cup granulated sugar
1/4 cup powdered sugar
2-1/2 cups milk
3 tbl. white vinegar
1 tsp. salt
1 egg
1 stick butter

Pour the milk into a container and add the vinegar. Let sit for at least 5 minutes until milk curdles.

In a large bowl, mix together the flour, baking powder, baking soda, sugar, powdered sugar and salt. Cut in the butter until mixture forms fine crumbs. Fold in the raisins. Add the curdled milk and egg, blending only until flour mixture is moistened.

Generously butter 2 loaf pans and divide the batter between the pans. Bake at 350° for 1 hour. Cool briefly in pans, then remove and cool on wire racks. Serve with butter or honey.


Irish Dance Performance

Labels:

Saturday, March 5, 2011

Lace Shelf Edging

A few people have remarked about the lace shelf edging I'm using on my kitchen cabinet shelves. It's made of vinyl. I bought it years ago at a gift store that has since gone out of business. I didn't have this kitchen cabinet at the time, and I don't have enough trim to cover all the shelves.

Vinyl Shelf Edging

Well, I Googled vinyl lace shelf trim and found that Amazon is selling something very similar! The pattern is a bit different, but it's made of vinyl like mine. Much easier to keep clean and lasts longer than the old-fashioned paper shelf trim my mom had when I was a kid!

Lace Shelf Edging

I prefer the vinyl edging in the kitchen, but in my side-by-side secretary where I display my teacups in the parlor, I just tacked on real lace edging I bought at the fabric store! You're sure to find something you love there. I selected this white eyelet trim.

Lace Trim Shelf Edging

Close-Up Lace Edging

I'm going to order the vinyl version from Amazon. It's just what I've been looking for to finish off my cabinet!

Other sites to check out:


Labels: ,